Introduction to Phoenix
Serokell
24 Aug 2021
•
13 min read
Introduction to Phoenix
If you have spent any time in the Elixir ecosystem, you’ve heard about Phoenix.
It’s one of the biggest pulls towards choosing Elixir for web development – a fantastic web framework that enables you to use the benefits of functional programming and OTP to build very scalable applications.
In this article, I’ll talk about Phoenix, why you should use it, and try to dispel some of the magic around it.
What is Phoenix?
Phoenix is the leading web framework in the Elixir ecosystem. It’s perfect for productively building scalable and reliable web experiences.
Phoenix is similar to other big Model-View-Controller (MVC) web frameworks like Rails and Django. It provides a large part of what you need for a web application out of the box, but it is a bit less “batteries-included”.
Right now, it’s frequently used together with LiveView, and, to a lesser extent, Alpine.js and Tailwind.
Phoenix LiveView
These days, you will see more of Phoenix LiveView than plain Phoenix.
Phoenix LiveView is a library built on top of Phoenix that enables developers to write interactive real-time web apps without writing JavaScript. It works by calculating page changes and pushing updates through WebSocket.
LiveView is a less complex alternative to using client-side frameworks for interactivity. With it, you can provide basic interactivity without making your app into a full-blown SPA.
There are similar projects in other languages, most famously Ruby’s Hotwire.
PETAL
A typical stack for Elixir web apps that is getting more and more popular is PETAL.
While the acronym seems a bit forced, it can be good to explore these technologies and how they fit together:
- Phoenix. The hero of the show.
- Elixir. The programming language in which Phoenix is written.
- Tailwind CSS. A framework that lets you write CSS inside HTML.
- Alpine.js. A tiny JavaScript framework for sprinkling client-side interaction when necessary.
- LiveView. A server-side rendering library that will provide most of the interaction for your application.
You can learn more about the stack from this article. If you want to set it up for your app, you might find this article helpful.
Why should you use or not use Phoenix?
Benefits
- Real-time. If you’re making a (semi)real-time web application that will serve tons of users simultaneously (e.g. Twitch or Discord), Phoenix is the perfect choice because of the built-in support.
- Functional. In contrast to most other top web frameworks, Phoenix is written in a functional programming language, which helps to write more reliable, maintainable, and easier-to-test code. If you want to do or learn functional programming while working on a web project, this is one of your best options.
- Productive. Phoenix helps you be productive while exposing the behind-the-scenes magic to anyone that is willing to explore it. In contrast to some of the more “opinionated” frameworks, it is also rather customizable.
Cons
- It can be hard to grasp. Elixir is three languages at the same time: you need to deal with some amount of metaprogramming, functional programming, and the rather unique OTP. Therefore, Elixir beginners are usually not well-prepared to tackle the whole thing immediately.
- Smaller community. Elixir and Phoenix have fewer people working on them than Node.js or Rails. Therefore, it’s less likely you can find answers to your issues on Stack Overflow, but there are plenty of people out there willing to help you on Elixir Forum or Slack.
- Smaller ecosystem. A smaller community implies fewer libraries, of course. All the crucial stuff is available, but some things you might need to build yourself.
What's inside a Phoenix app?
In comparison to some other large web frameworks, Phoenix is relatively tame. With some effort, you can understand how the magic happens.
In this section, I will try to dispel some of the magic concerning Phoenix. ✨ If you just want to start hacking, you can scroll right past to our to-do tutorial.
It’s all about the plug
The thing that really helped me understand how Phoenix works is looking at plugs.
Plugs are the basic elements of Phoenix. They come from the Plug library, and they are functions that transform the conn data structure. The conn data structure contains, like, everything you might need to know about the incoming request and more.
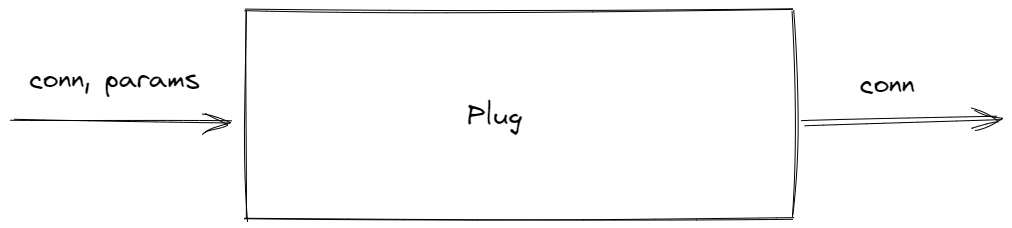
Most of the Phoenix modules are plugs. All of the work that Phoenix does can be boiled down to:
- Receiving a request.
- Converting it to
conn. - Passing it through a dozen plugs.
- Rendering a response.
Here’s a good introduction to plugs if you want to learn more.
The life and death of Phoenix requests
Further on, let’s have a broad look at the Phoenix request lifecycle.
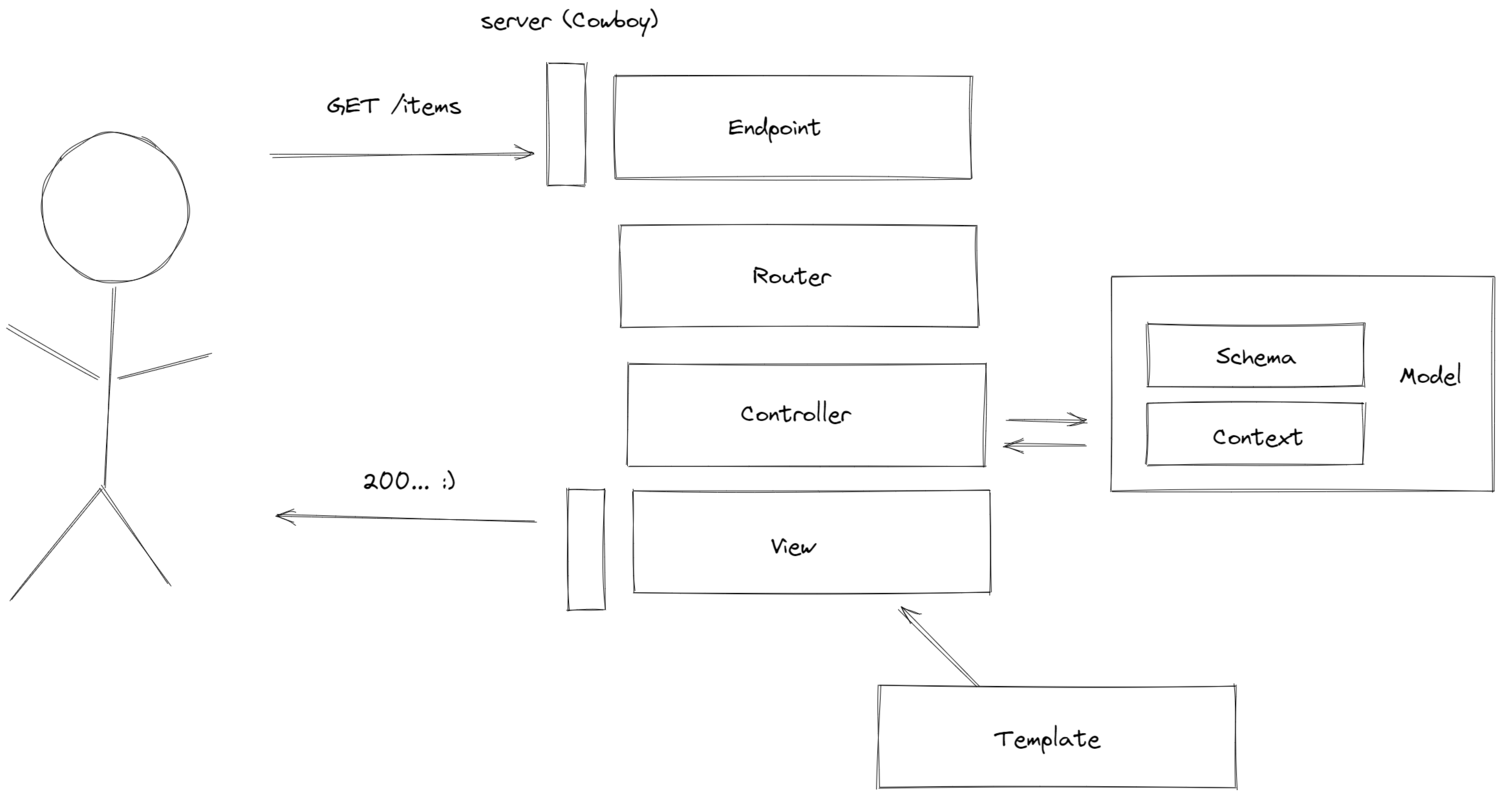
The endpoint is where all the requests land after being converted to conn by the server. It defines a common pipeline that all of the requests pass through.
Then conn gets forwarded to the router, which moves it through its pipeline (developers can define different ones to handle different requests) and passes it to its controller. The controller launches a view that uses conn data to render the page for the user.
Views get most of their content from templates, which are HTML or JSON files with a dash of Elixir inside them. They get compiled into the view module during the compilation process with macros. (Don’t worry, we’ļl get to macros.)
In other words, Phoenix is itself a pipeline for transforming conn.
conn
|> endpoint
|> router
|> controller
|> view
The endpoint, the router, and the controllers are plugs. As I said before: at each step, we are just moving the request further and further through composable functions. In the end, we render it. Ah, the glory of functional programming. 😌
Where to put business logic?
Phoenix is not your application, so the “application” gets moved outside of the web folder. It rests in the lib/appname of your app folder, and it is what would be called a “model” in other frameworks.
Here are two things that you most likely will include there:
- Contexts. Basically, Elixir modules that host business logic. This is where you will put stuff that interacts with the database, for example.
- Schemas. They map data from the database into Elixir structs and vice versa.
Macros
Let’s talk a bit about the magic incantations you might have seen in Phoenix code (router is the biggest offender).
Macros are functions that generate code at compile-time. We frequently use them for two reasons:
- To pull other code into our modules (quickest import statements + boilerplate setup in the West).
- To write concise code.
When you see something like use TodoWeb at the top of a module, it means that before compiling, Elixir will go to the module with that name, find a macro called __using__, and put the code that it generates inside the caller module.
Quick tip: if you use ElixirLS in VSCode, you can use the expand macro command (in the command palette) to look at the final code that will be generated with use.
Macros are also used for evading boilerplate when calling plugs, working with the routing table, etc.
It might take another article to explain how each of these macros work, but they shouldn't cause you a lot of problems right off the bat, hopefully.
You can find a more detailed introduction to macros in our article on metaprogramming in Elixir.
Namespaces
One thing that Phoenix is very particular about is naming. The Programming Phoenix book suggests to not go against the grain here. It can be a good idea to just use generators to enforce the naming convention without all the hassle.
Given a controller called [Name]Controller, its view is called [Name]View, and the templates connected to it are in the [App Name]_web/templates/[Name] directory.
It’s possible to change the root module of the templates folder by changing it in the view function in [App Name]_web.ex, if necessary.
Ecto
Ecto is a framework that provides a database wrapper for Phoenix, together with a query language similar to Linq and ActiveRecord. We will not delve too deep inside it in this article, but it is something you most likely will use in your Phoenix app.
If you want to get started with it, I suggest reading the official documentation and watching this video.
How to create a todo app in Phoenix
In this section, we will make a todo app using Phoenix. Using the app, you will be able to submit todo items to a database, view them, mark them as completed, and delete them.
While much of it can be done with the HTML generator, we will create modules by hand to get used to the structure of Phoenix.
Due to the limitations of the medium, I won’t be able to explain every single detail, but I’ll be sure to leave links to documentation when necessary. Additionally, you can always send me questions on Twitter.
Preparation
First, run mix phx.new todo. This will create a new Phoenix project called todo. When asked, choose to install dependencies.
Afterwards, change to the directory created and run mix ecto.create. (You might need to put your PostgreSQL database credentials in config/dev.exs.)
After that is done, you can run the server using mix phx.server and connect to it via localhost:4000. You should now see the Phoenix “Hello world!” screen.
Create a model for items
Let’s get our database ready.
To add a table to our database with Ecto, we need to create a migration.
mix ecto.gen.migration add_items
Afterwards, you need to find the generated migration file in priv/repo/migrations and edit it to look like this:
defmodule Todo.Repo.Migrations.AddItems do
  use Ecto.Migration

  def change do
    create table (:items) do
      add :description, :string
      add :completed, :boolean

      timestamps()
    end

  end
end
Here, we are creating a table of items, each of which have a string description and a boolean value, which marks if they have been completed or not.
To migrate the database, type mix ecto.migrate in the console.
Afterwards, we need to create the part of our app that will interact with the database. It will consist of an Ecto schema and a context.
First, create a new module named items.ex in the lib/todo folder. We’ll return to it later.
defmodule Todo.Items do

end
Then, create a subfolder called items, and create a file called item.ex. This will be our schema.
defmodule Todo.Items.Item do

  use Ecto.Schema
  import Ecto.Changeset

  schema "items" do
    field :description, :string
    field :completed, :boolean, default: false

    timestamps()
  end

  def changeset(item, params) do
    item
    |> cast(params, [:description, :completed])
  end
end
Our schema represents our database. The only difference is that it has a default value for :completed – false.
In addition, we have added a changeset. Ecto changesets help validate data before inserting it into the database. You can write custom changesets for each occurrence of data insertion. Right now, we do not have a great use for them, but they might come handy when expanding the app.
Is there a generator for making a migration and a schema?
Yes. The above steps can be done faster by using mix phx.gen.schema.
Now we can interact with our repository in IEx.
iex(1)> alias Todo.Items.Item
Todo.Items.Item
iex(2)> alias Todo.Repo
Todo.Repo
iex(3)> Repo.insert(%Item{description: "Write a Phoenix tutorial", completed: false})
[debug] QUERY OK db=15.0ms idle=94.0ms
INSERT INTO "items" ("completed","description","inserted_at","updated_at") VALUES ($1,$2,$3,$4) RETURNING "id" [false, "Write a Phoenix tutorial", ~N[2021-06-07 08:52:57], ~N[2021-06-07 08:52:57]]
{:ok,
 %Todo.Items.Item{
   __meta__:# Ecto.Schema.Metadata<:loaded, "items">,
   completed: false,
   description: "Write a Phoenix tutorial",
   id: 2,
   inserted_at: ~N[2021-06-07 08:52:57],
   updated_at: ~N[2021-06-07 08:52:57]
 }}
iex(4)> Repo.all(Item)
[debug] QUERY OK source="items" db=0.0ms idle=625.0ms
SELECT i0."id", i0."description", i0."completed", i0."inserted_at", i0."updated_at" FROM "items" AS i0 []
[
  %Todo.Items.Item{
    __meta__:# Ecto.Schema.Metadata<:loaded, "items">,
    completed: false,
    description: "Write a Phoenix tutorial",
    id: 2,
    inserted_at: ~N[2021-06-07 08:52:57],
    updated_at: ~N[2021-06-07 08:52:57]
  }
]
But it would be nice to write some functions to make it easier to interact with our database.
To do that, let’s go to our context – Todo.Items – and create the functions we need by using what Ecto.Repo offers us.
defmodule Todo.Items do

  alias Todo.Items.Item
  alias Todo.Repo
  import Ecto.Query

  def get_item(id) do
    Repo.get(Item, id)
  end

  def list_items() do
    query = Item |> order_by(desc: :id)
    Repo.all(query)
  end

  def mark_completed(id) do
    item = Repo.get(Item, id)
    item = Ecto.Changeset.change item, completed: true
    Repo.update(item)
  end

  def delete_item(id) do
    item = Repo.get(Item, id)
    Repo.delete(item)
  end

  def create_item(params) do
    %Item{}
    |> Item.changeset(params)
    |> Repo.insert()
  end
end
Ecto provides a DSL for doing your queries, which can be useful if you need to do more complicated ones.
Now we have our “app” ready. Let’s proceed with creating the web interface for it.
Create an index page
First, let’s just try to get all of the todo items on screen.
To start off, we need to add a route to the router (lib/todo_web/router.ex).
  scope "/", TodoWeb do
    pipe_through :browser

    get "/items", ItemsController, :index
  end
This will move us forward to the index function of ItemsController. Now we need to create it.
Go to todo_web/controllers and create items_controller.ex.
defmodule TodoWeb.ItemsController do
  use TodoWeb, :controller

  alias Todo.Items

  def index(conn, _params) do
    items = Items.list_items()
    render(conn, "index.html", items: items)
  end
end
Here, we call our app to provide us with the items from the database.
After that, the render function calls ItemsView to use the index template, with items passed as the items variable to the template.
Since we have no ItemsView, we need to create it in todo_web/views.
defmodule TodoWeb.ItemsView do
  use TodoWeb, :view

end
As you can see, it’s nothing much. You can define functions that you want to execute in templates inside here, but we won’t do that in this tutorial.
At last, the template.
Go to todo_web/templates, and create a folder called items. In it, create a file called index.html.eex.
Paste in the following:
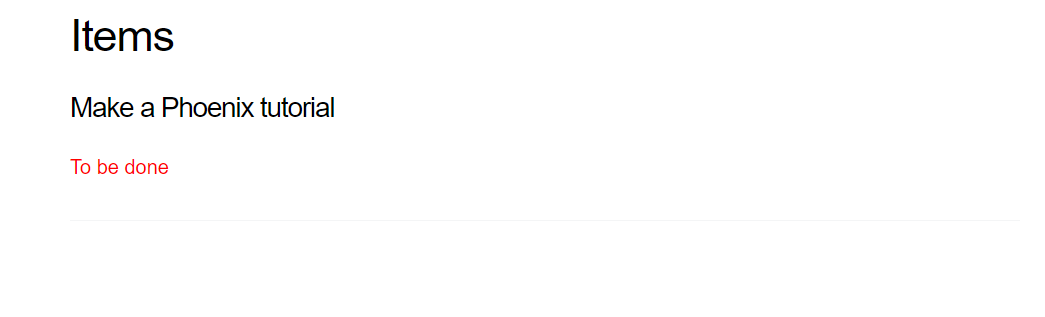
<h1>Items</h1>

<%= for item <- @items do %>
  <h3><%= item.description %></h3>

  <%= if item.completed do %>
    <p style="color:green;">Completed</div>
  <% else %>
    <p style="color:red;">To be done </div>
  <% end %>

  <hr>
<% end %>
EEx templates are just HTML or JSON files, inside of which you can run Elixir functions. With @variable syntax, we can access the variables that were passed to the render function.
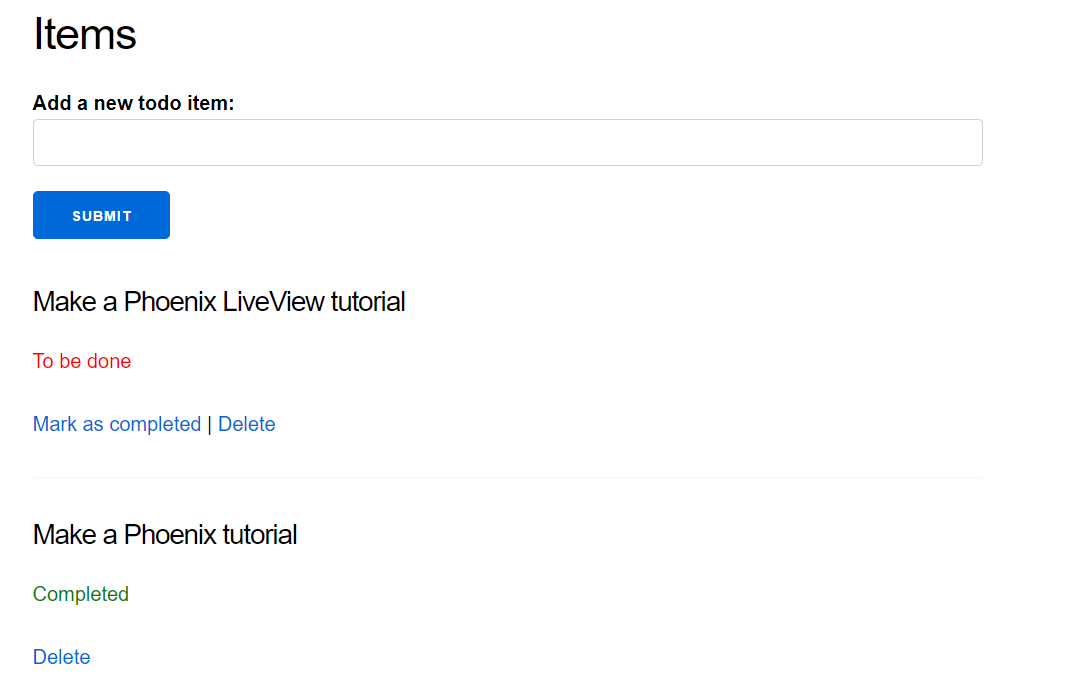
If we run our app with mix phx.server, we should see something like this (if you tried out inserting items to the repository through IEx):
Add a submit form
As the next step, let’s make a submit form that will take a description and add an item to the database.
As before, we will work from the router up.
First, let’s add a handle for a POST request to the router that will point to create.
  scope "/", TodoWeb do
    pipe_through :browser

    get "/items", ItemsController, :index
    post "/items", ItemsController, :create
  end
Afterwards, we need to handle it in the ItemsController. Here, we just call a function in our Items context and redirect to the main page.
  def create(conn, %{"item" => item_params}) do
    Items.create_item(item_params)
    redirect(conn, to: "/items")
  end
Then, we can add a form for this action to the index page.
<%= form_for @changeset, Routes.items_path(@conn, :create), fn f -> %>

  <label>
    Add a new todo item: <%= text_input f, :description %>
  </label>

  <%= submit "Submit" %>
<% end %>
Since Phoenix forms take changesets, we need to supply our Item changeset to the form.
defmodule TodoWeb.ItemsController do
  use TodoWeb, :controller

  alias Todo.Items
  alias Todo.Items.Item

  def index(conn, _params) do
    items = Items.list_items()
    changeset = Item.changeset(%Item{}, %{})
    render(conn, "index.html", items: items, changeset: changeset)
  end

  def create(conn, %{"item" => item_params}) do
    Items.create_item(item_params)
    redirect(conn, to: "/items")
  end
And that’s it!

Add other actions
We also want to mark our items as completed and delete them from the app.
As the last step, let’s add support for these two actions. I assume you have already gotten the hang of it, so it should be quick.
First off, router:
    patch "/items/:id/complete", ItemsController, :complete
    delete "/items/:id", ItemsController, :delete
Then controller:
  def complete(conn, %{"id" => id}) do
    Items.mark_completed(id)
    redirect(conn, to: "/items")
  end

  def delete(conn, %{"id" => id}) do
    Items.delete_item(id)
    redirect(conn, to: "/items")
  end
Then template:
<h1>Items</h1>

<%= form_for @changeset, Routes.items_path(@conn, :create), fn f -> %>

  <label>
    Add a new todo item: <%= text_input f, :description %>
  </label>

  <%= submit "Submit" %>
<% end %>

<%= for item <- @items do %>
  <h3><%= item.description %></h3>

  <%= if item.completed do %>
    <p style="color:green;">Completed</p>
      <div>
        <%=link("Delete", to: "/items/#{item.id}", method: :delete) %>
      </div>
  <% else %>
      <p style="color:red;">To be done </p>
      <div>
        <%=link("Mark as completed", to: "/items/#{item.id}/complete", method: :patch) %> |
        <%=link("Delete", to: "/items/#{item.id}", method: :delete) %>
      </div>
  <% end %>
  <hr>
<% end %>
And we have all we need.
Our app has some interaction and would benefit from the reactivity that Phoenix LiveView gives. In one of our future articles, I will cover how you can use LiveView to improve it. Stay tuned!
Further reading
If you want to learn more about Phoenix, here are a few resources you can use:
- Phoenix documentation. Phoenix documentation is great, and it's a good way to find answers to the questions you might have.
- Phoenix: an Intro to Elixir’s Web Framework. This is one of the best talks I’ve seen on the subject: concise and informative.
- Programming Phoenix. Do you feel like you learn best with a book? This awesome book (co-written by three people – the creator of Elixir, the creator of Phoenix, and another accomplished author) will guide you through implementing Rumbl, a real-time video app with comments. Highly suggest reading.
- Programming Phoenix LiveView. If you want to jump right into how modern Phoenix apps are built, I recommend reading this book. It will get you started with regular Phoenix as well, so you don’t have to worry about things being too complicated right off the start.
Serokell
Serokell is a software development company focused on creating customized high-performance solutions with functional programming technologies.
See other articles by Serokell

WorksHub
Jobs
Locations
Articles
Ground Floor, Verse Building, 18 Brunswick Place, London, N1 6DZ
108 E 16th Street, New York, NY 10003
Subscribe to our newsletter
Join over 111,000 others and get access to exclusive content, job opportunities and more!