What is an API and How to Build One
AMAECHI AMARACHI
28 Mar 2022
•
11 min read
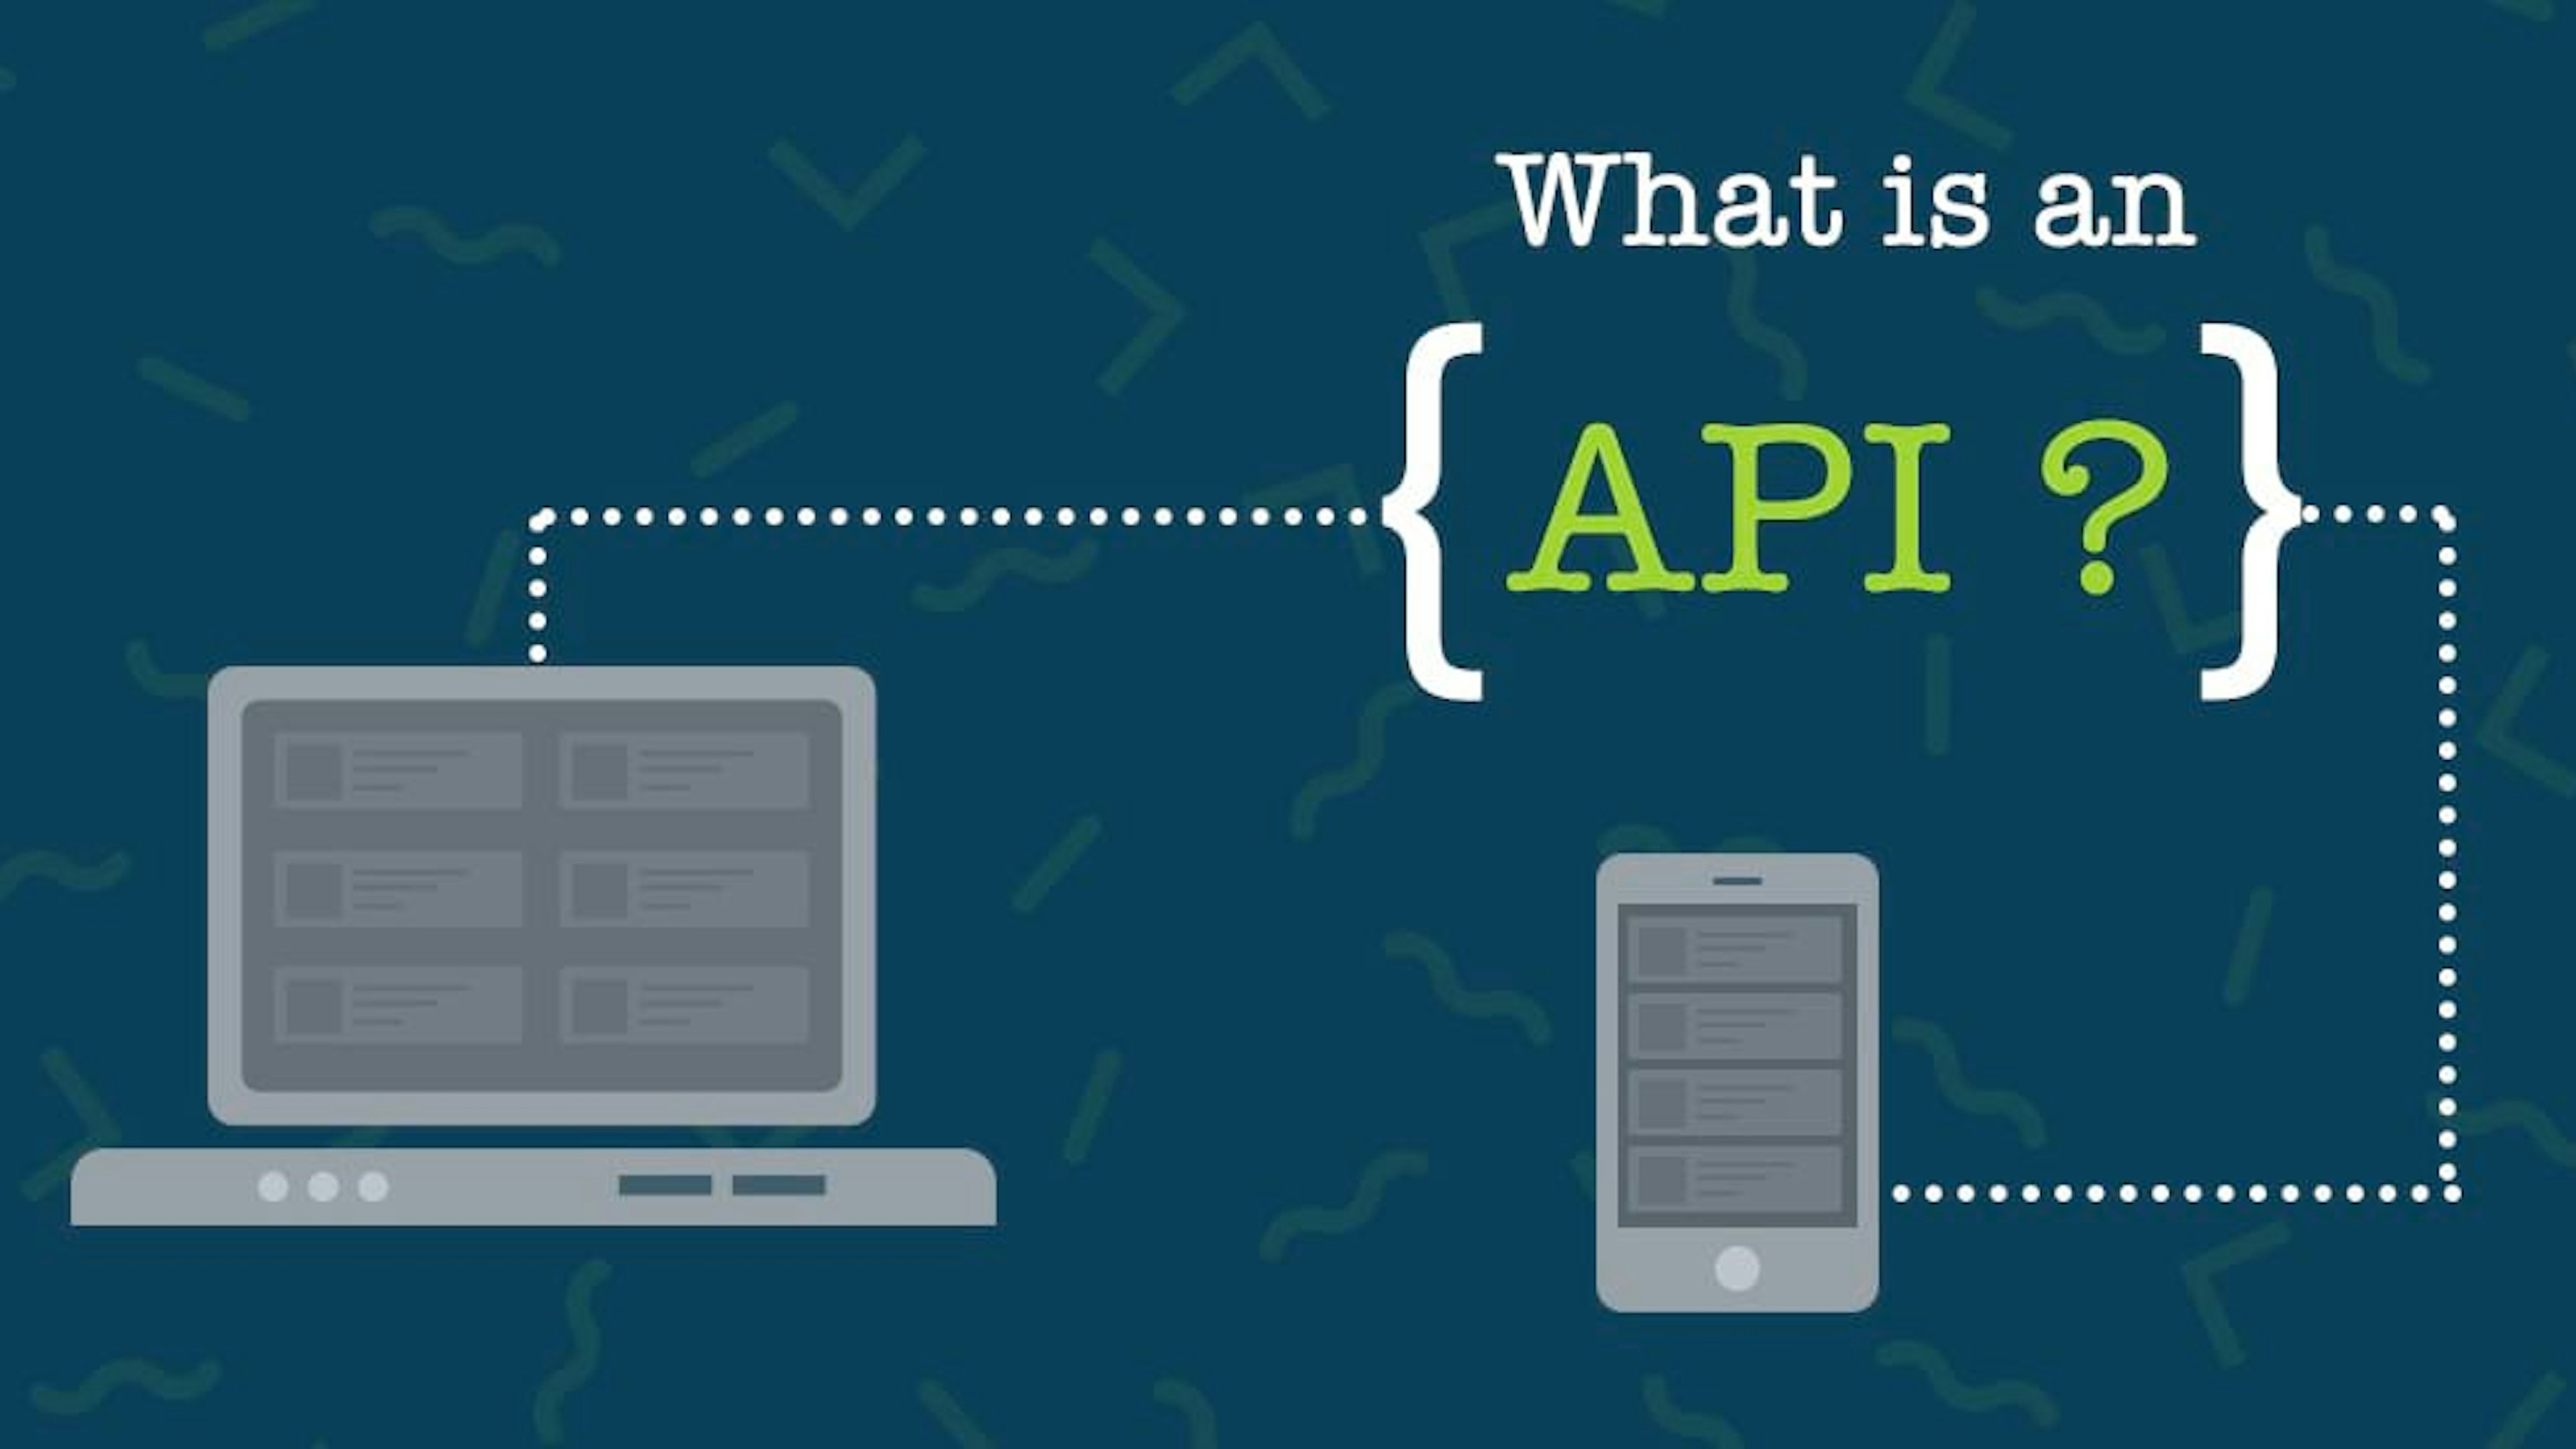
What is an Application Programming Interface (API)
What does an API even Mean?
Whether you are new to the software development space or have been in the space for a while, you must have heard people say the word API and you might be wondering what it means. API stands for Application Programming Interface. Think of an API as a piece of software providing service or facilitating communication between two applications. It is an intermediary and the most common way to connect two different applications allowing them to share information with themselves.
For clearer understanding. let’s explain with a real-life example;
Suppose you visit a restaurant to order a meal, a waiter will take your order after which he/she will go into the kitchen to get your meal from the chef already preparing them. The chef will provide the exact meal you requested because the waiter wrote down your orders earlier and passed it to the chef. From this example, you can think of the chef and you (the client) as two pieces of software. You both need the service of an API ( in this case, the waiter) to communicate. An API is like a bridge that connects two independent applications that need to interact with each other.
In the web development space, APIs allow the frontend of an application to communicate with the backend. This way, data from the frontend can be easily sent to the backend where it can be stored in a database and retrieved when needed.
API Types
There are different standards and protocols that one can follow when building an API. Because of this, there have come to be different API types and scopes in the software development space. APIs could be categorized as either an open/public, partner, composite, or private/internal API.
Open API
An open or public API is an API available for use by anyone on the internet. These types of APIs usually have low authorization requirements. An open API in most cases is free and open-sourced but others are monetized by the creator. Users can be charged per API call.
Developers choose to make their APIs public to encourage other developers to integrate their services into their applications. Enterprises can create a free and open version of their API product to boost usage and hopefully attract people that will eventually adopt the paid version.
Private/Internal API
A private API is built for internal use only. Private APIs are a direct opposite of a public API and are usually intended to connect internal software within an organization. Authorization is usually high as only a select group of people are allowed access to these APIs for security reasons and to avoid much damage during a bridge.
Composite API
A composite API combines/integrates two or more APIs so that developers can make requests and get one response with data from these two different APIs. Simply put, a composite API provides an interface to fetch data from more than one API preventing you from making concurrent requests. These types of APIs are good at reducing the number of calls to be made in order to retrieve data from different sources.
Partner API
Partner API is very similar to public APIs. The difference is that Partner APIs are only available to select business partners to an organization. Authorization is usually high to allow only selected and verified partners access. Institutions that build partner APIs have greater control over their product and can easily monetize it.
REST API Architecture
An API architecture refers to a program that exposes data from the backend for use in a completely different application. In other words, this software implements a programming interface or API. The most common API architecture includes; REST, SOAP, and JSON-RPC.
A REST (Representational State Transfer) is an application programming interface that defines a set of rules for creating different web services. This architecture was created in 2000 by Roy Fielding. A REST API consists of a server and a client making a given request. For an API to be RESTful, it must follow each of the below six constraints.
Uniform interface
Client-server
Stateless
Cacheable
Layered system
Code on demand
Uniform Interface
The uniform interface constraint states that a RESTful API must provide a uniform interface for interacting with a given API. This means that all the resources made available through this API must be accessible through a similar approach and individual requests are identified within requests. The data being exposed must also follow a consistent format.
Client-server
Just like we stated earlier, a RESTful API must have a client, in this case, an external application making a given request as well as a server that is holding the requested data. A client and server may be developed independently they must but the interface between them must be maintained.
Stateless
This constraint states that a RESTful API must not store the client’s state on the server. The client is rather required to store a context that the server can then use to process further requests. Statelessness allows the server to treat each request from the client as an independent.
Cacheable
A RESTful API has the ability to store frequently accessed data to reduce latency and bandwidth. Good caching in a REST application reduces the number of client-server interaction that goes on during data exchange. The server response in most cases indicates whether or not a given response is cacheable.
Layered System
A RESTful application may consist of a multiple-layer architecture. This allows you to perform different operations in different servers which are usually unaware of each other.
Code on demand
Though optional, a RESTful API can send both a static resource either in JSON or XML format as well as an executable code to the client.
RESTful API in Nodejs (JavaScript runtime environment)
Restful APIs in JavaScript follow the REST architecture as in other programming languages. Here, we make use of four different functions to perform CRUD operations.
GET: This provides us with read access to stored data POST: POST allows us to create a new resource PUT: Used to update resources in a server DELETE: DELETE is used to remove a resource from our server
Nodejs is a javascript runtime environment that allows us to use Javascript to build APIs for frontend use. We will be using nodejs to build our first API.
Note: you must have nodejs and npm installed to continue from here.
Building our API
We will start building our API from here. You should have a good knowledge of javascript in order to understand what we’re doing in this section. Our API should allow us to perform basic CRUD operations like create, read and delete. We will be calling this project books API. Create a folder in your system and give it a name of your choice. Mine is called “API”
Run the below command in your folder directory
npm init
This will create a package.json file in your directory. The content should look as so;
{
  "name": "api",
  "version": "1.0.0",
  "description": "",
  "main": "index.js",
  "scripts": {
    "test": "echo \"Error: no test specified\" && exit 1",
  },
  "keywords": [],
  "author": "",
  "license": "ISC",
  "dependencies": {
  }
}
Let's proceed to install the necessary dependencies for our project
npm install express nodemon dotenv cors body-parser mongoose
Express is a nodejs framework that will allow us to build out our API quickly
Nodemon automatically restarts our server whenever we make changes so we don’t have to
Dotenv enables us to use environment variables in our application. We will be storing our MongoDB URI as an environment variable.
Cors will handle everything relating to cors so that we don’t encounter an error when integrating our API in the frontend.
Body-parser will help in the passing of middlewares
We will be using mongoose to connect to our MongoDB database
Since MongoDB will be used on this project, I encourage you to visit the MongoDB atlas website, create a collection and copy your MongoDB URI. Your URI should look like this
mongodb+srv://<username>:<password>@cluster0.kxnme.mongodb.net/test
Proceed to create a .env file in your root folder and paste the below snippet.
MONGO_URI="mongodb+srv://<username>:<password>@cluster0.kxnme.mongodb.net/test"
Replace your username as well as password with your username and password. Update your directory so that you have a similar folder structure as below
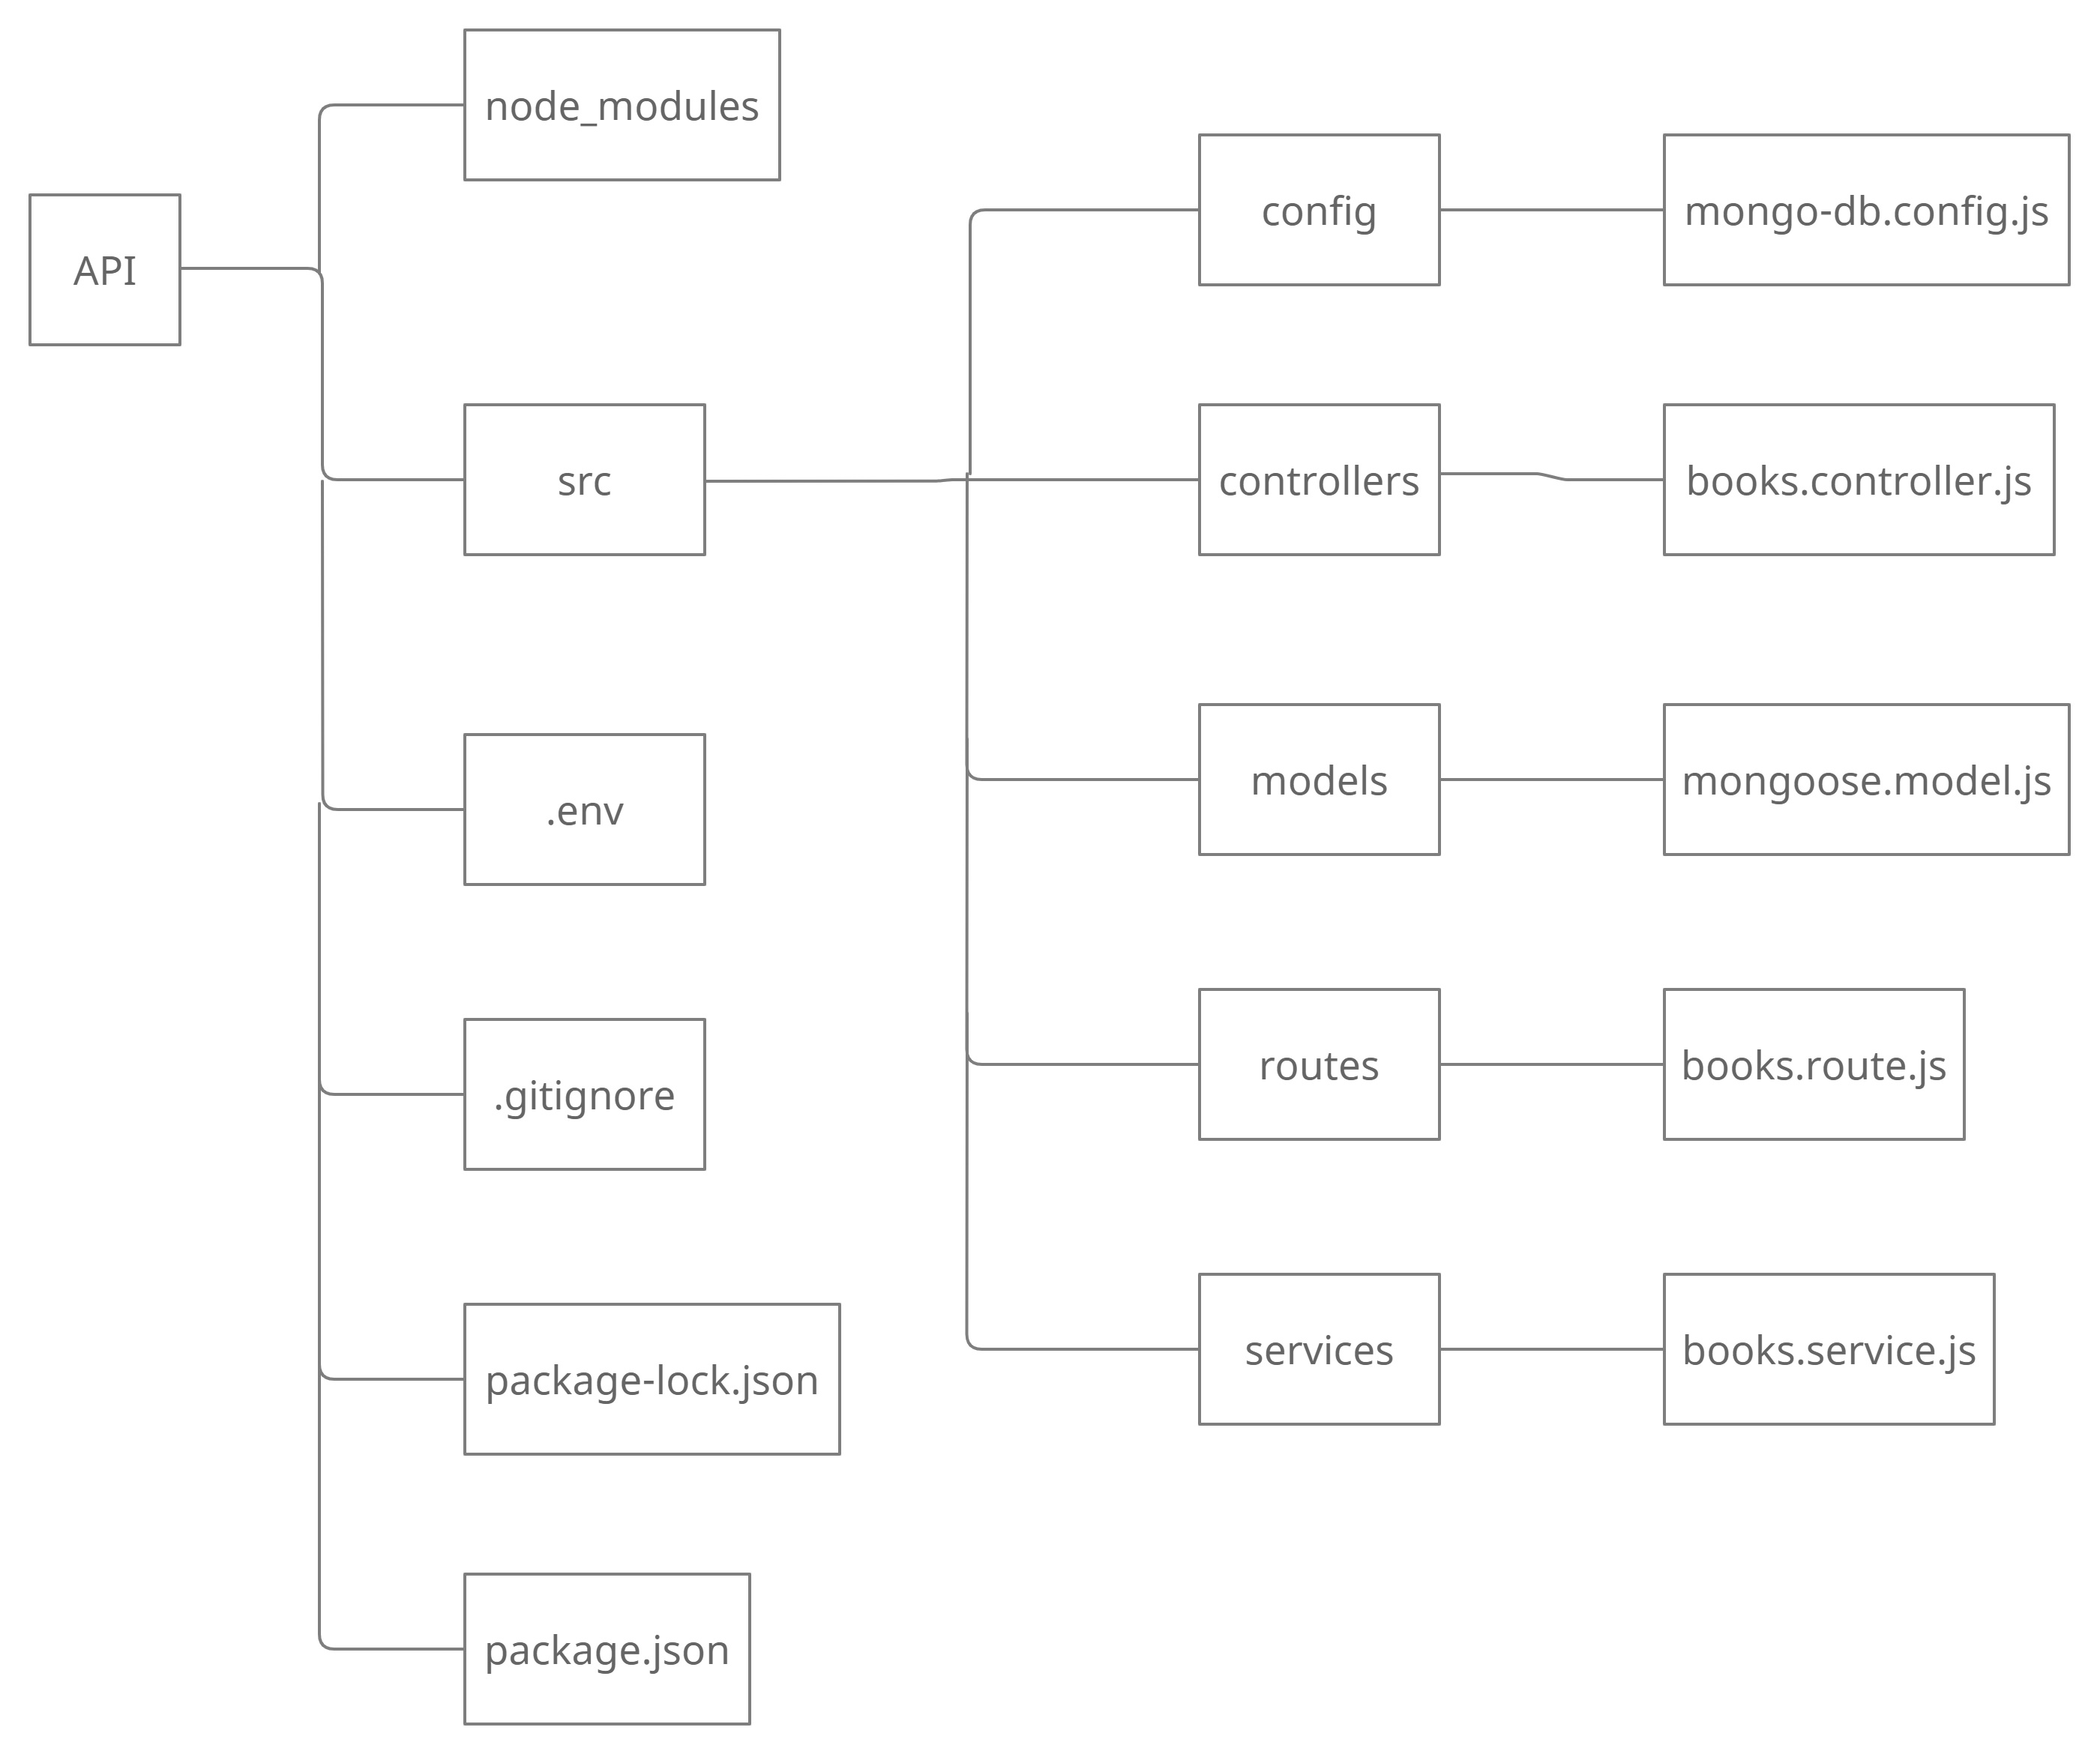
First, let's update our mongoose.model.js file with our MongoDB schema.
const mongoose = require('mongoose')

const bookSchema = new mongoose.Schema({
   name: {
       type: String,
       required: true,
       trim: true
   },
   id: {
       type: String,
       required: true,
       trim: true
 },
   genre: {
       type: String,
       required: true,
   },
   isbn: {
       type: String,
       required: true,
   }
}, {
   timestamps: true
});


const book = mongoose.model("Book", bookSchema);

module.exports  = book
Here we created our mongoose schema called bookSchema. Book is also exported
Paste the code snippet below on our mongo-db.config.js file
const mongoose = require('mongoose')
const dbURI = process.env.MONGO_URI

function initializeMongodb() {
   mongoose.connect(dbURI)

   //check for connection

   mongoose.connection.on('connected', function () {

       console.log('Mongoose default connection open to ' + dbURI);
   });
   // error check

   mongoose.connection.on('error',function (err) {

       console.log('Mongoose default connection error: ' + err);
   });
}

module.exports = initializeMongodb
We are initializing and exporting our “initializeMongodb” function. The MONGO_URI that we stored earlier in our .env file is used here.
The next step we should take is to start our server. In order to do so, lets update our index.js file in the root folder
const express  = require('express')

const cors = require("cors")

const dotenv = require('dotenv')

const  initDB =  require('./src/config/mongo-db.config')

dotenv.config()

require("dotenv").config()


const app = express();

const bodyParser = require('body-parser')

app.use(cors());

app.use(bodyParser.json());

app.use(bodyParser.urlencoded({ extended: false }));

app.get('/' , (req, res) => {
    res.send("Hello, please move to /v1")
})


const PORT = process.env.PORT || 8080

app.listen( process.env.PORT || 8080 , () =>{
    console.log(`port running at ${PORT}`)
    initDB()
})
First, we initialize our express application and then listen at port 8080. We added “process.env.PORT” so that our port can be filled from .env if available.
We are using the app.get() method to handle any get request to home. Whenever a get request is directed to the home path, we should get the message, “hello, please move to /v1” which is sent via res.send()
Cors, body-parser, and dotenv were also configured here. Note that we talked about the functions of each one of them earlier.
Once the server starts our mongoDB database should also connect
Remember to update our package.json file under the scripts section with the below script.
"start":"nodemon"
This will allow nodemon to start our server whenever we run “npm start”
To confirm if this works, run “npm start”. If done correctly, we should be getting a message whenever we visit “localhost:8080”.
To make everything less complex, we will start with the add books functionality.
Express provides us with an app.router() function that allows us to create routes outside of the index page and then use them inside our index.js file. Proceed to the books.route.js file and update the content with the below code snippet
const { getBooks } = require("../controllers/books.controller")

const express = require("express")

const route = express.Router()

route.post('/add_book' , addBook)

module.exports = route;
Here, we created and then exported our route. Remember that we are using post this time around instead of get since we are posting data to our database. We are using addBook here but we haven’t created it yet so let’s do that now. Update your books.controller.js file
const  {
  _addBook,
}  = require("../services/books.service")


 async function addBook(req, res) {

    const book = req.body;

    const response = await _addBook(book);

    if (!response) {
      res.status(404).send(`The book was not added`);
    }

    if (response) {
      res.status(200).send({
        success: true,
        message: "Book added successful",
        data: response,
      });
    }
}
For us to add our new book to the database, we need to pass the data to be added in the form of a JSON. This way, we can access this data by calling req.body as seen above. The _addBook function being called above is where interaction with the database will take place. This function will either return our data or false incase something goes wrong.
The content of out books.service.js file should be as so
const Book = require('../models/mongoose.model')

const mongoose = require("mongoose");

// add this inside your route

const _addBook = async (book) =>{
    console.log(book, "service")
    const  bookDB = await Book.find({
           id:  book.id
        })


    if(bookDB.length > 0){
        return
    }

    const newBook  = new Book(book)

    newBook.save(function (err) {
        if (err) {
            console.log(err)
            return
        };
      })

     return book;
}


module.exports = { _addBook}
Here, we are checking if the new data we are adding already exists. If not, our new item is added to the database using the .save() method provided to us by the mongoose.
Before we can say that our add books functionality is complete, let's quickly adjust the content of our index.js file by importing and using our routes.
const  routes = require('./src/routes/books.route')

app.use("/v1", routes)
The latter should be placed right above our PORT declaration
If done correctly, our new data should be added to our database whenever we make a post request to localhost:8080/v1/add_book
You can test this out using postman.
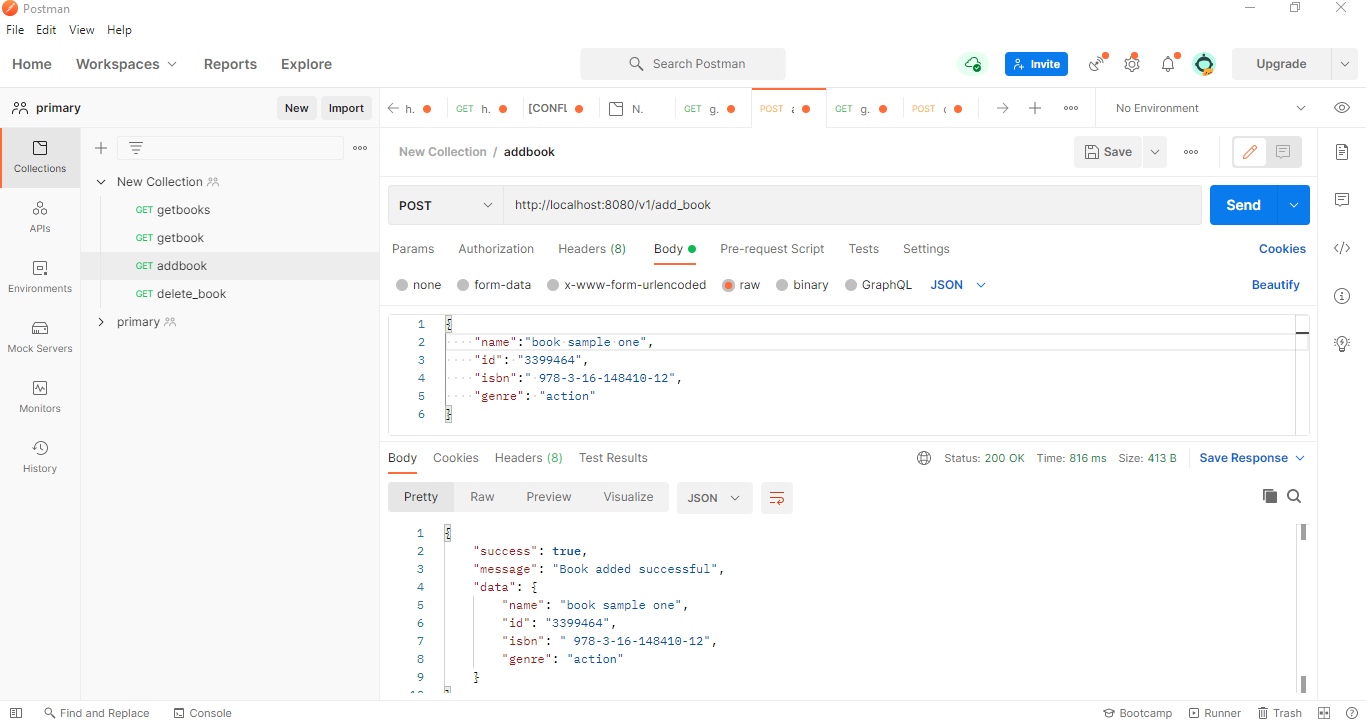
{
   "name":"book sample one",
   "id": "3399464",
   "isbn":" 978-3-16-148410-12",
   "genre": "action"
}
Don’t forget that the JSON data passed as a body should be in the above format.
Hurray, we have successfully integrated an add book functionality to our API.
Let's follow the same process to implement the remaining functionalities including, get book, get books and delete books;
Our books.route.js file should be updated as so;
const express = require("express")

const { getBooks, getBook, addBook, deleteBook } = require("../controllers/books.controller")

const route = express.Router()


route.get('/book' , getBook)

route.get('/books' ,  getBooks)

route.post('/add_book' , addBook)

route.post("/delete_book", deleteBook)


module.exports = route;
Proceed to the books.controller.js file to add the getBook, getBooks and deleteBook controllers.
const  {
 _getBooks,
 _getBook,
 _addBook,
 _deleteBook,
}  = require("../services/books.service")


async function getBooks(req, res) {

 const books = await _getBooks();

 if (!books) {
   res.status(404).send("no books found");
 }

 if (books) {
   res.status(200).send({
     success: true,
     message: "Books fetch successful",
     data: books,
   });
 }
}


async function getBook(req, res) {

   const book_id = req.query.id;
   console.log(book_id , 'book id')

   const book = await _getBook(book_id);

   if (!book) {
     res.status(404).send(`The book with the id ${book_id} was not found`);
   }

   if (book) {
     res.status(200).send({
       success: true,
       message: "Book fetch successful",
       data: book,
     });
   }
}


async function addBook(req, res) {

   const book = req.body;
   console.log(book , 'con')

   const response = await _addBook(book);
   console.log(response , 'res')
   if (!response) {
     res.status(404).send(`The book was not added`);
   }

   if (response) {
     res.status(200).send({
       success: true,
       message: "Book added successful",
       data: response,
     });
   }
}


async function deleteBook(req, res) {

   const { id } = req.body;

   const response = await _deleteBook(id);

   if (!response) {
     res.status(404).send(`Book with id ${id} could not be deleted`);
   }

   if (response) {
     res.status(200).send({
       success: true,
       message: "Book delete successful",
       data: req.body,
     });
   }
}

module.exports = { addBook, getBooks, getBook, deleteBook }
The getBook accepts an id query while the deleteBook function is passed an id as a JSON body. A params allows us to pass datas like id to the route when making an API request. For example;
localhost:8080/book/?id=6543211
Here the id is passed along with the API request
Just like we did when creating the add books feature, we are calling three different functions from our books.service.js file. These functions will handle our request to either get or delete specific data.
Finally, lets update our books.service.js file
const Book = require('../models/mongoose.model')


const _addBook = async (book) =>{
    console.log(book, "service")
    const  bookDB = await Book.find({
           id:  book.id
        })
    console.log(bookDB, "bookDB")

    if(bookDB.length > 0){
        console.log("book already exist")
        return
    }

    const newBook  = new Book(book)

    newBook.save(function (err) {
        if (err) {
            console.log(err)
            return
        };
      })

     return book;
}


 const _getBook = async (id) =>{
    console.log(id, "id")
    const book = await Book.find({  id  })

    if(!book) return

    if(book.length == 0){
        console.log("no book found")
        return
    }

    if(book){
        console.log(book , "book")
        return book
    }

}

const _getBooks = async () =>{

    const book = await Book.find({  })

    if(book){
        return book
    }

    return false

}


const _deleteBook = async (id) =>{

    console.log("reached delete service", id)

    const book = await Book.find({  id  })

    console.log(book, "book from delete")
    if(book.length == 0) return

    const response = await Book.deleteOne({  id : id })

    console.log(response, "response")

    if(!response) return

    if(response){
        return true
    }

}

module.exports = { _addBook, _getBook, _getBooks, _deleteBook }
We’re using Book.find() and Book.deleteOne() to find an item and also delete an item with a specific id.
Now, we should be able to perform create, get and delete operations. You should test this out using postman.
Conclusion
This article is a comprehensive guide introducing you to what an application programming interface (API) is and why they’re important in the software development space. We went even further to building our first API in javascript. I encourage you to explore how APIs are implemented in other languages. You can also implement the update feature that we left out for practice purposes.
AMAECHI AMARACHI
👩🏽💻Front-End Engineer ✍🏽Technical Writer 🚀 Co-organiser @vuejsng
See other articles by AMAECHI

WorksHub
Jobs
Locations
Articles
Ground Floor, Verse Building, 18 Brunswick Place, London, N1 6DZ
108 E 16th Street, New York, NY 10003
Subscribe to our newsletter
Join over 111,000 others and get access to exclusive content, job opportunities and more!